Tutorial#
Let’s learn by example.
In this tutorial, you’ll build a smart email routing workflow using MailTrigger.
It’s based on a real-world scenario:
GitHub automatically emails issue notifications to support@example.com
You want to forward only payment-related issues to the Finance team
You’ll learn how to:
Set up a rule that detects “payment” in the subject
Forward matching emails to alice@example.com
Optionally, send a Telegram alert for faster visibility
By the end, you’ll have a working MailTrigger route that turns incoming GitHub issue emails into automated multi-channel alerts — without modifying your existing GitHub workflow.
The Story#
Your company’s GitHub repository has a workflow that e-mails every newly opened Issue to support@example.com. That works well—until an Issue involves a customer payment. Finance also needs those payment-related messages, otherwise they may miss urgent billing tasks.
Rather than maintaining two separate workflows (or flooding Finance with every Issue), you decide to use MailTrigger to:
keep sending all Issue notifications to Support, and
automatically forward only the “payment” ones to alice@example.com in the Finance team.
Goal & Expected Outcome#
After completing this tutorial you will be able to:
Detect GitHub Issues whose e-mail subject includes the word payment.
Forward those specific messages to alice@example.com while still delivering the original to support@example.com.
In short, MailTrigger will route two copies of the same e-mail to different recipients based on its content.
Note
In MailTrigger, a Rule decides when something should happen, an Action defines what to do, and a Route connects them together into a workflow.
For a deeper understanding of these terms, see the Key Concepts section.
Step-by-Step Guide#
1. Create Your Account and Mailbox#
Go to MailTrigger and click Sign Up.
After verifying your email, log in to the dashboard.
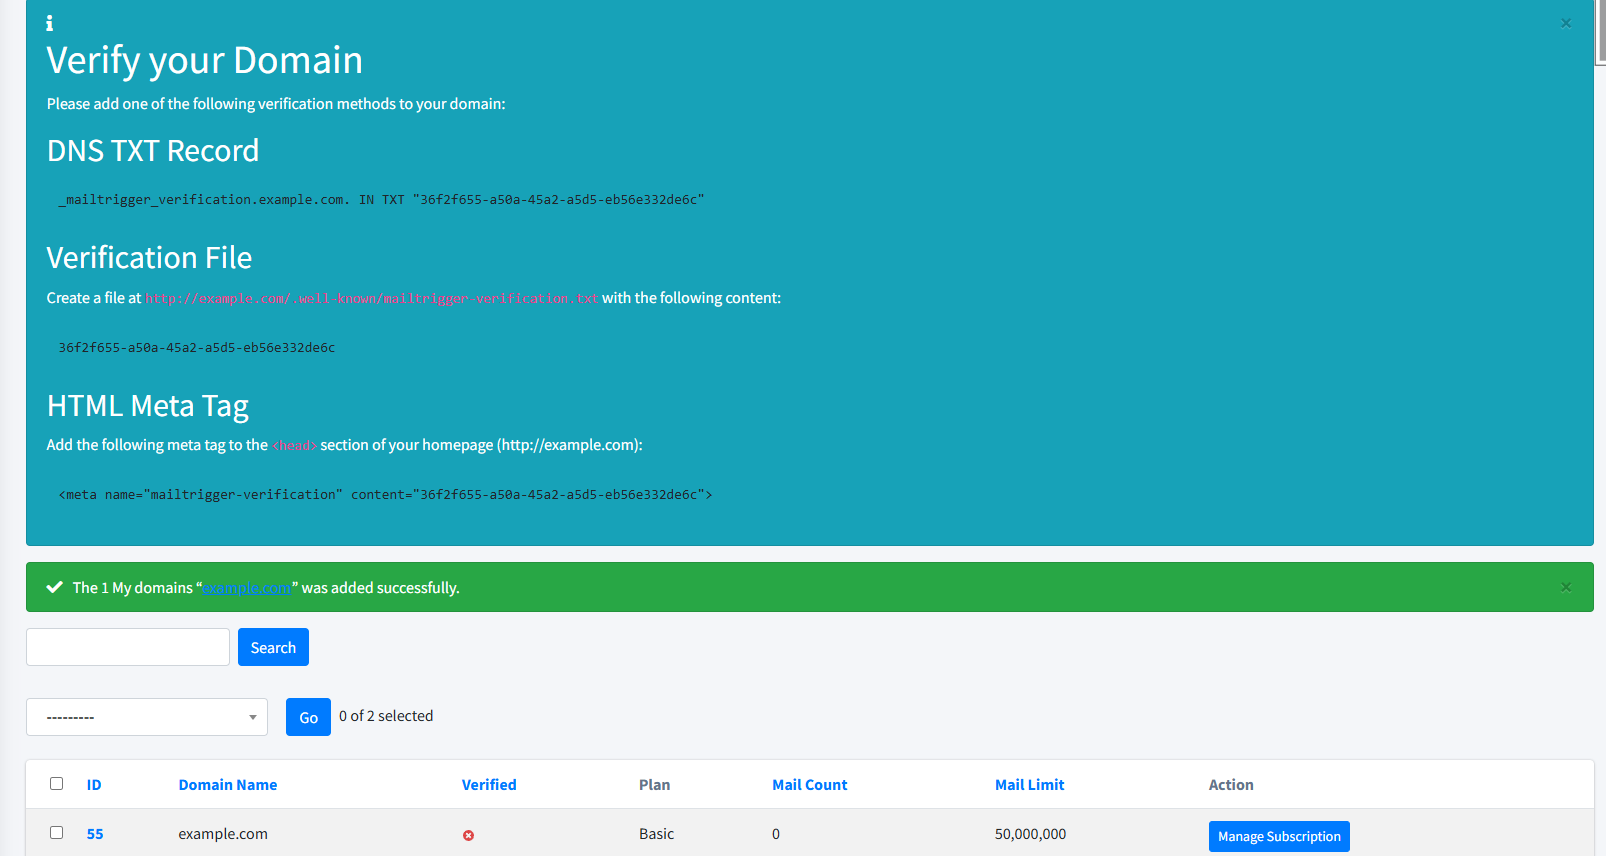
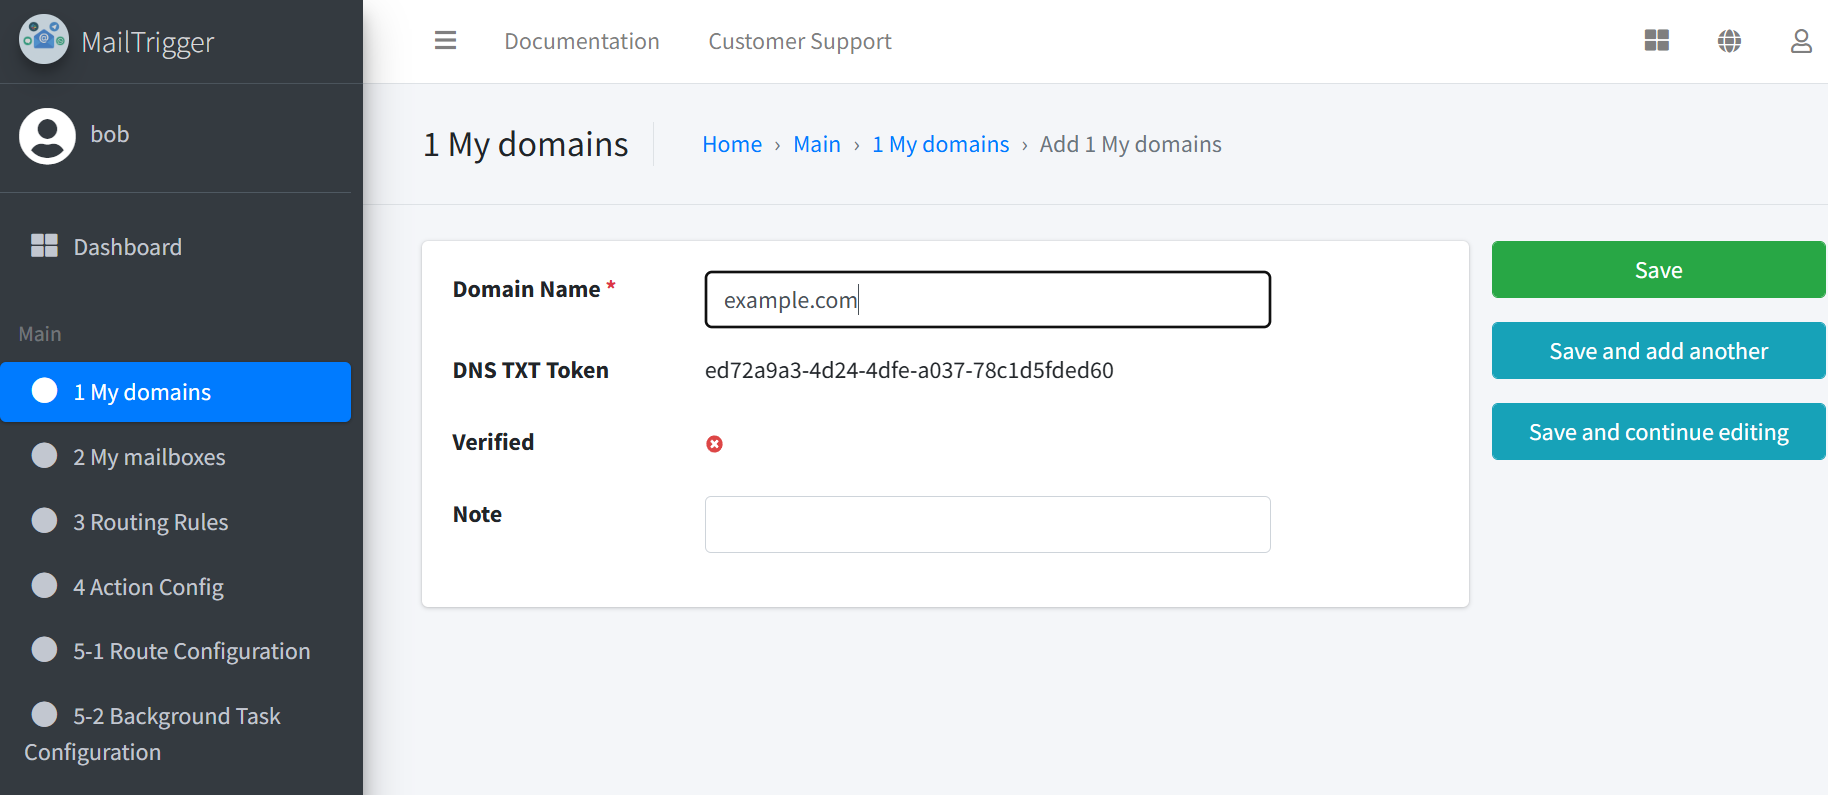
Navigate to Domains → Add Domain and provide:
Domain – e.g.
example.com
Add the provided TXT verification record to your domain’s DNS settings.
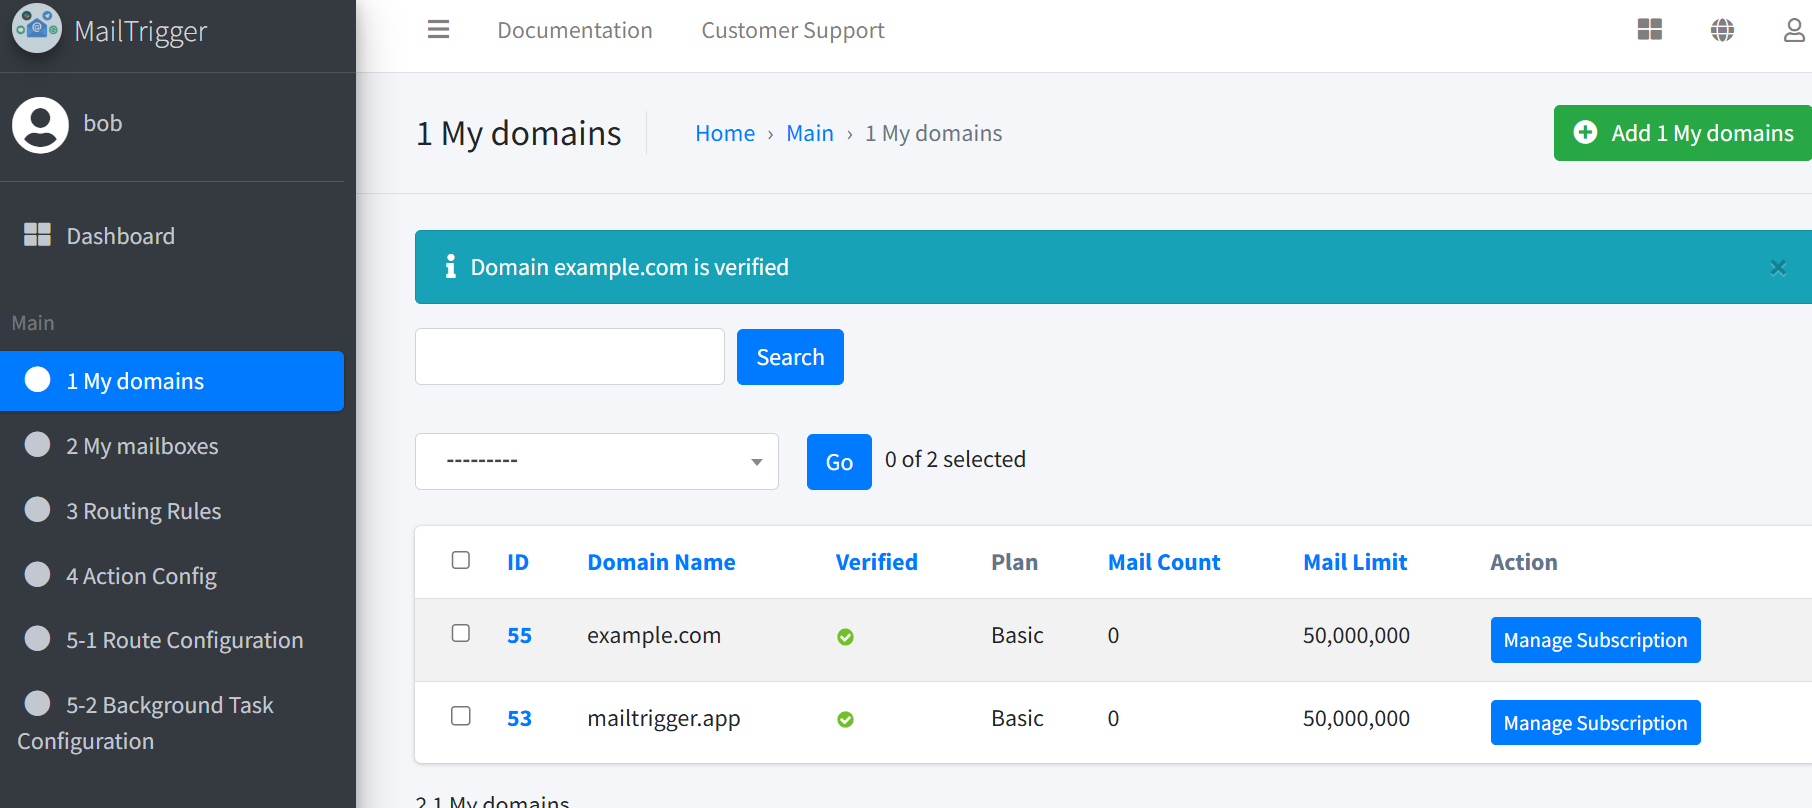
Return to MailTrigger and click Verify. A green Verified badge confirms success.
Go to Mailboxes → Add Mailbox, choose the verified domain, set a user name (e.g.
devops), and assign a password.
Note
This mailbox (e.g.
devops@example.com) will be used to authenticate when sending emails via MailTrigger’s SMTP server.Once done, keep your email address and password handy — you’ll use them in your GitHub workflow next.
2. Create the Payment Keyword Rule#
Target : Subject
Rule Type : Includes Text
Value :
payment
This rule matches any e-mail whose subject includes the word payment (case-insensitive).
Note
✅ Testing Rules
After creating a Rule, click the Test button on the right of the Rule entry. You can enter a test email manually, and run the test to verify whether the Rule matches the test input. The result will clearly indicate if the Rule worked as expected.
3. Create the Forward Action#
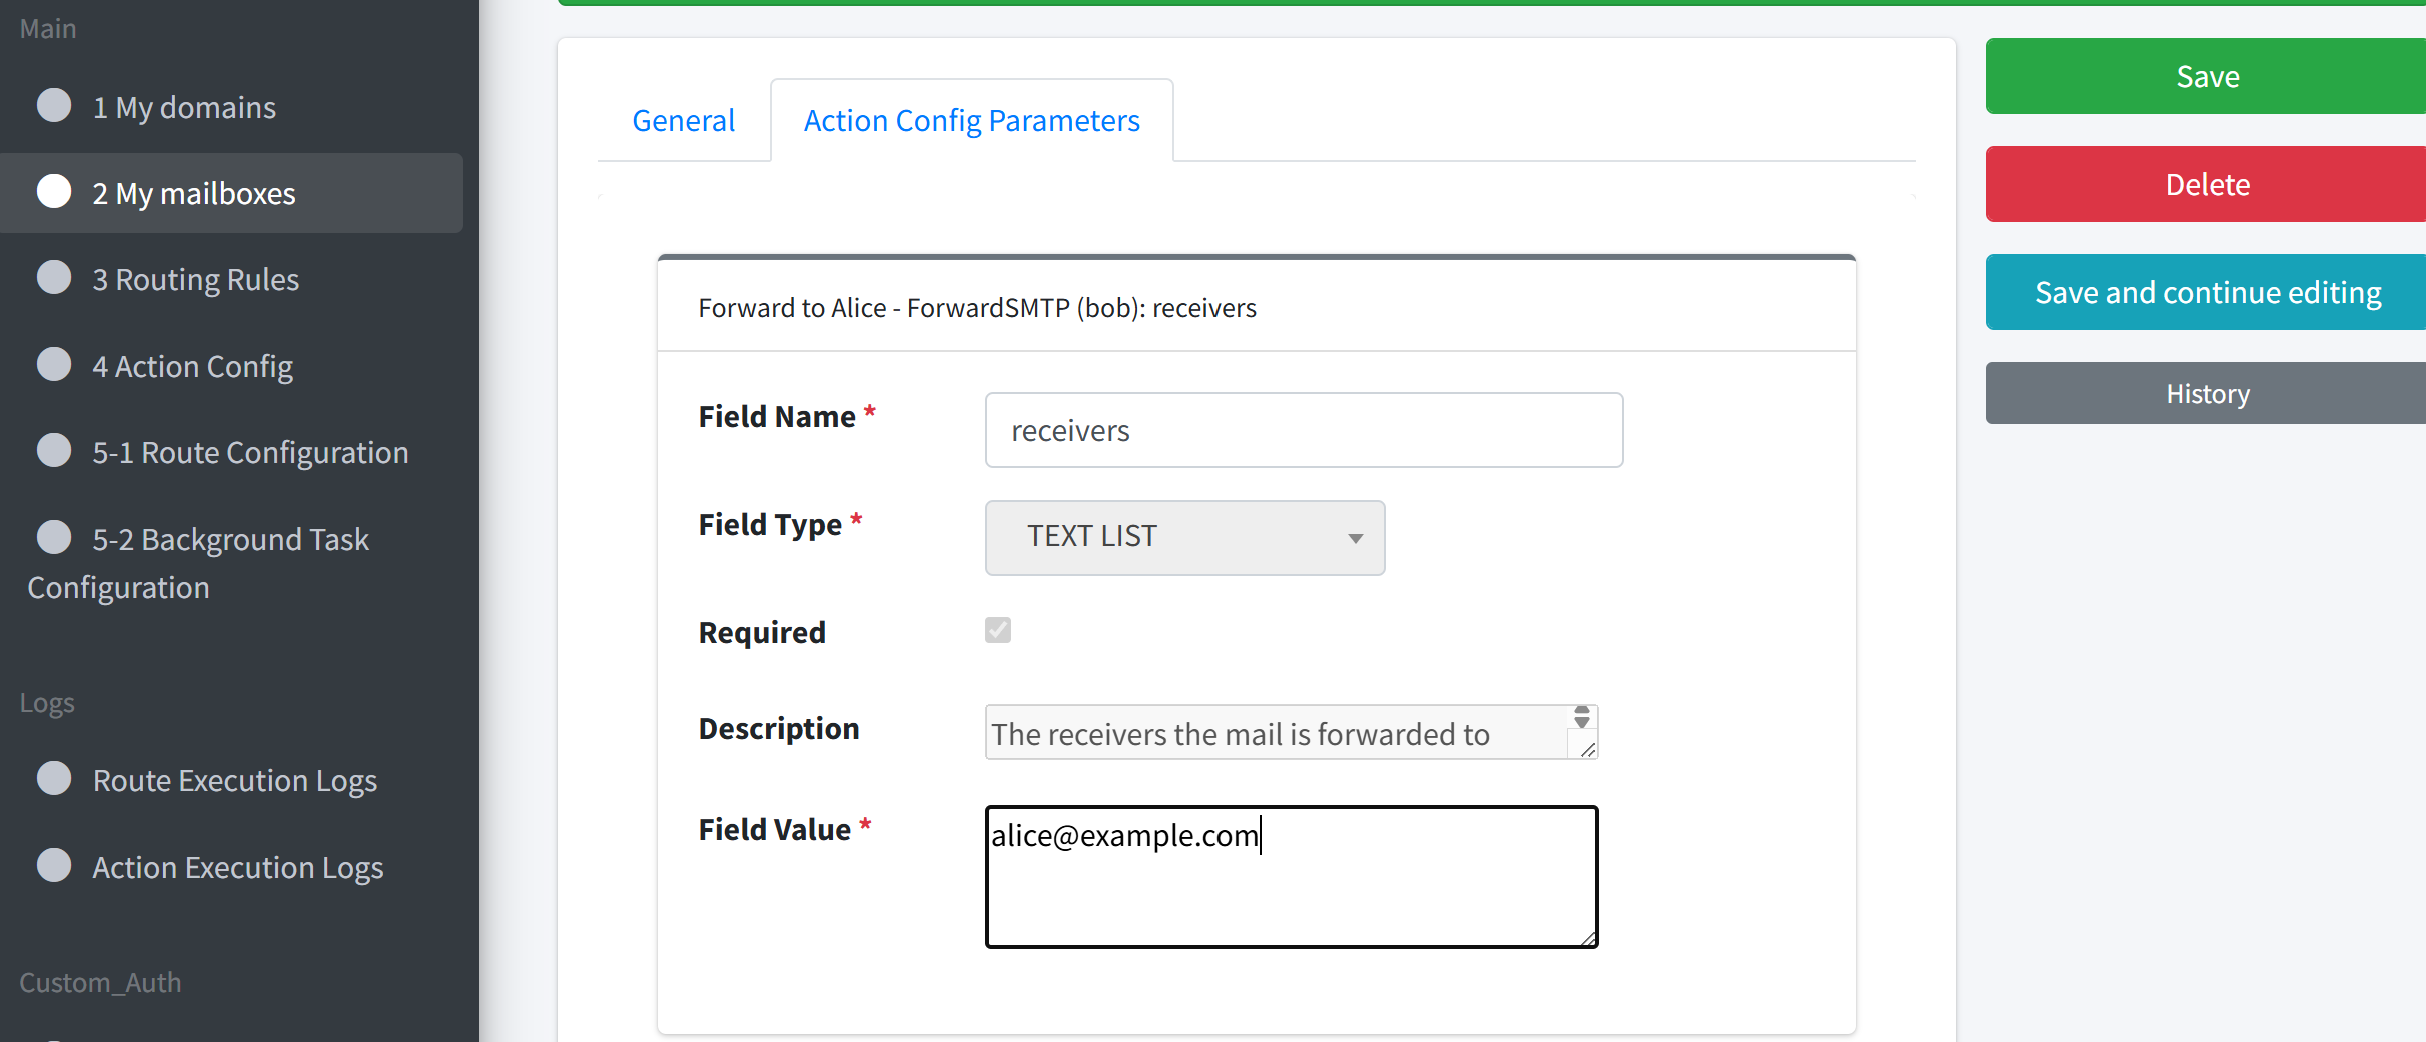
Name :
Forward to AliceAction Type: Forward (SMTP)
Parameters
receivers:alice@example.com

Note
✅ Testing Actions
After creating an Action, click the Test button next to the Action. You can input a test email message and run the test. The result will show whether the Action executed successfully and display detailed logs.
⚠️ Action tests do send real messages, so make sure the configuration is correct and your receivers are ready to receive them.
4. Create the Route#
Name :
Payment-Issue → AliceMailbox :
devops@example.comRules to Apply
Sender =
devops@example.com(auto-generated when the mailbox was created)Subject contains “payment” (the rule from Step 2)
Mail Filter Option : Match All Rules
Note
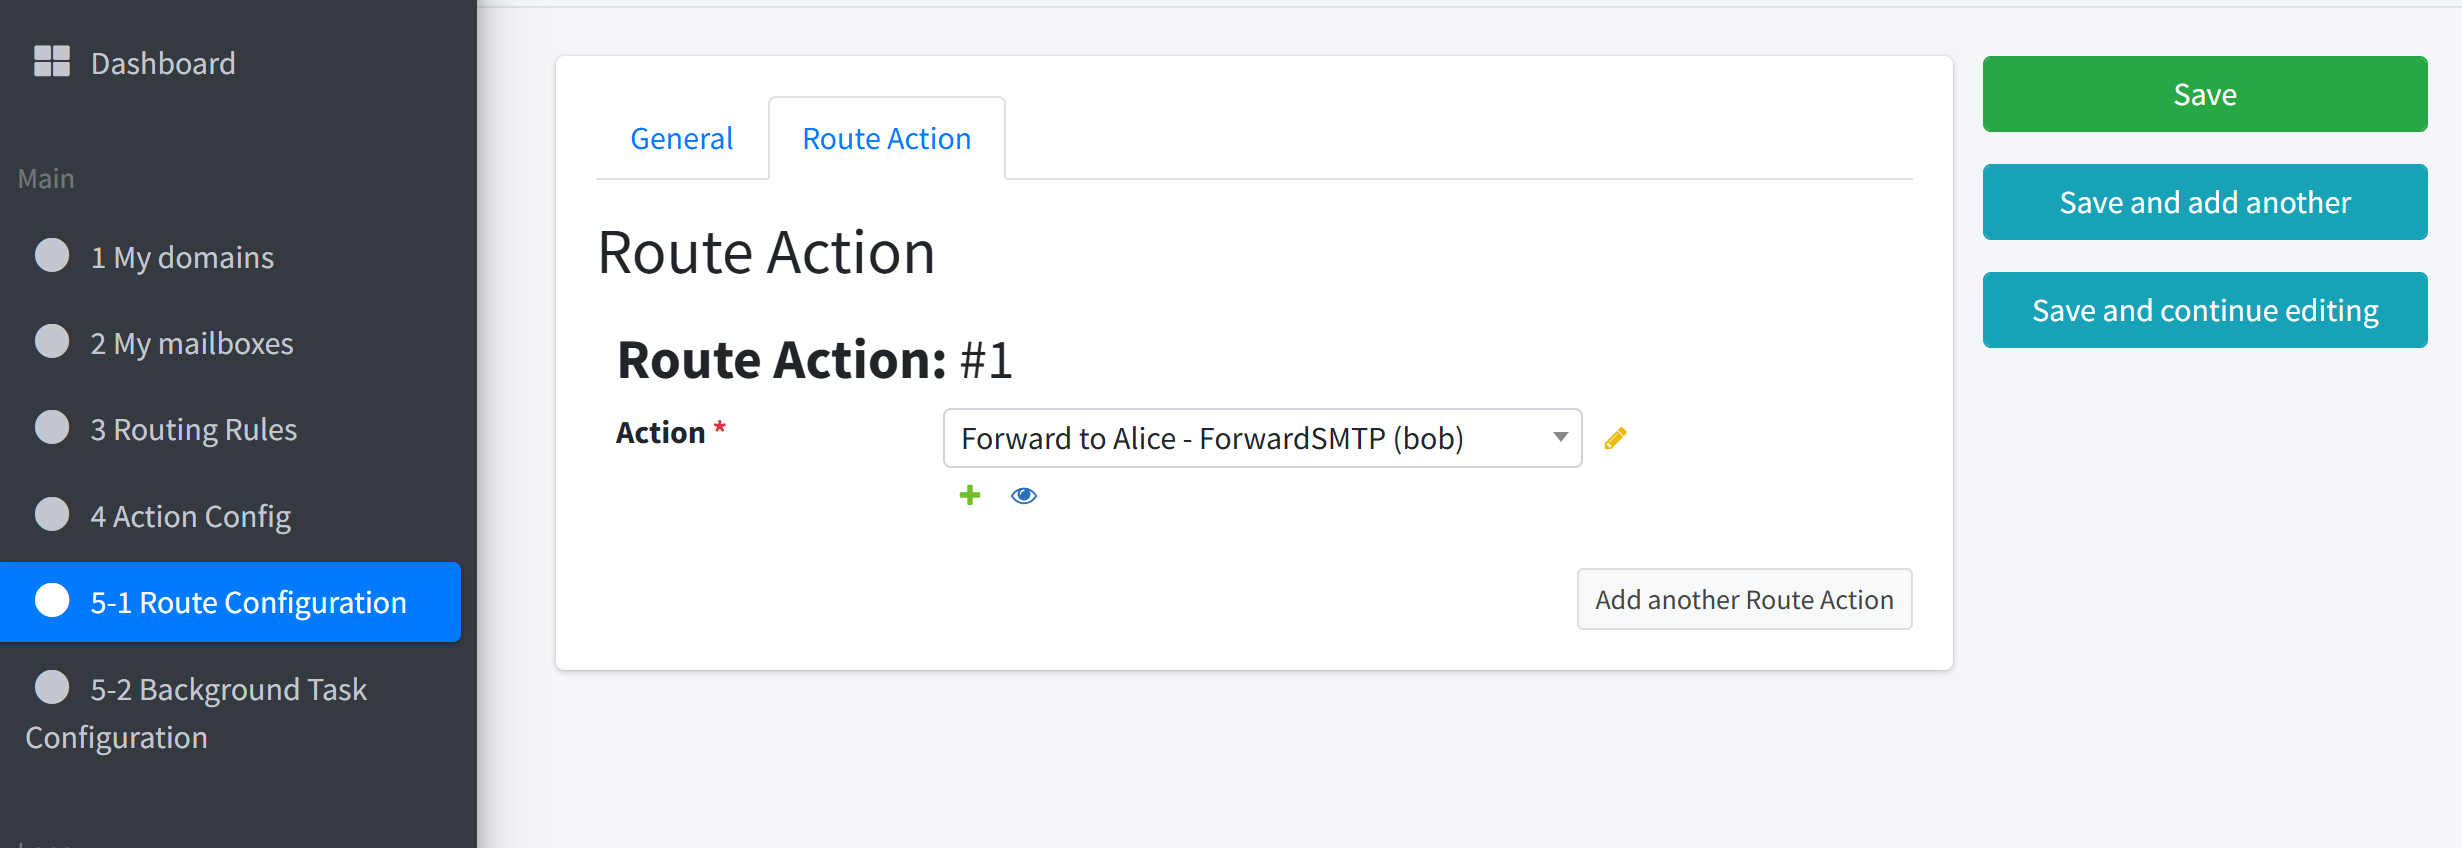
Match All Rulesmeans both conditions must be true before the route can run.Actions :
Forward to AliceExecution Mechanism : Sequential (only one action, so order is irrelevant)
Note
Execution Mechanism
Sequential – actions run one after another. Parallel – actions run at the same time.
Pass to Next Route : not checked (this route is specific; the default route covers the general case)
Note
Pass to Nexttells MailTrigger not to stop after this route. If you enable it, other routes that also match will run afterwards.

Note
✅ Testing Routes
After creating a Route, click the Test button beside the Route. Enter a test email and run the test. MailTrigger will execute all the Actions inside the Route, and return detailed execution results for each one (including whether they succeeded or failed).
⚠️ Like Action tests, Route tests will really perform the configured actions (e.g. send emails, notify chats), so it’s useful for confirming that your workflow behaves exactly as expected.
5. Verify Route Order#
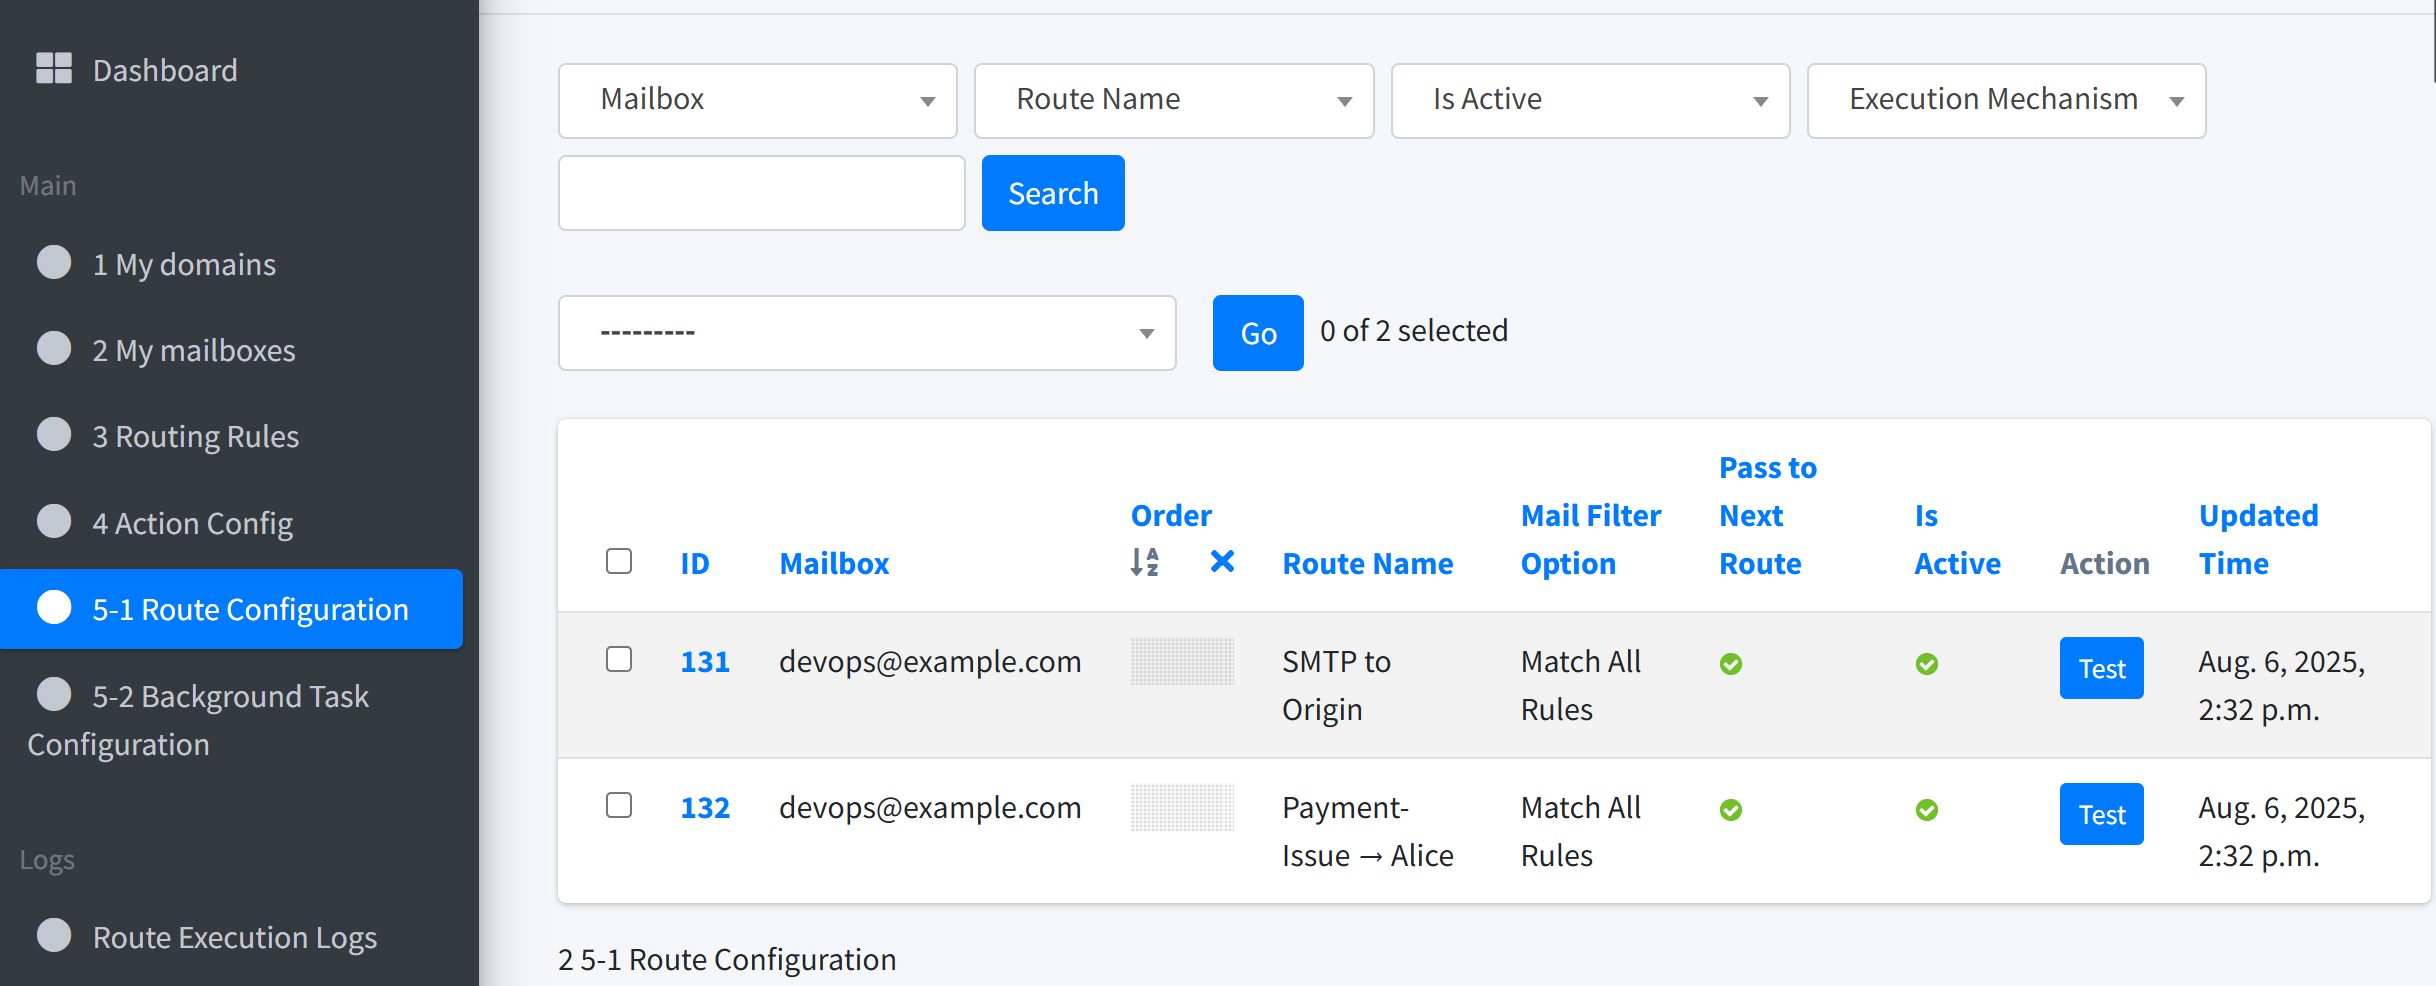
In Routes → Route Configuration you should now see two routes:
SMTP to Origin (default created when the domain has valid MX records)
Payment-Issue → Alice (your new one)
Drag SMTP to Origin above the new route and ensure
SMTP to Origin has Pass to Next enabled.
This sends the original e-mail first, then, if it matches the keyword,
triggers the forward copy to Alice.
6. Quick Testing (Command Line)#
Windows (PowerShell)#
Send-MailMessage -From "devops@example.com" `
  -To "support@example.com" `
  -Subject "New payment issue" `
  -Body "This issue is related to billing." `
  -SmtpServer "smtp.mailtrigger.app" `
  -Port 587 -UseSsl `
  -Credential (
      New-Object PSCredential "devops@example.com" `
          (ConvertTo-SecureString "YOUR_MAILBOX_PASSWORD" -AsPlainText -Force)
    )
Linux (swaks)#
To install swaks, please refer to the Official Installation Guide.
swaks --to support@example.com \
      --from devops@example.com \
      --server smtp.mailtrigger.app \
      --port 587 --auth LOGIN \
      --auth-user devops@example.com \
      --auth-password YOUR_MAILBOX_PASSWORD \
      --tls \
      --data "Subject: New payment issue\n\nThis issue is related to billing."
These commands simulate a real e-mail being sent from devops@example.com
with “payment” in the subject. If your route is configured correctly:
A copy will be delivered to support@example.com
A second copy will be forwarded to alice@example.com (via your Forward Action)
Note
The password used here is the one you set for devops@example.com
when creating the mailbox inside MailTrigger.
7. Sample GitHub Workflow#
Below is a minimal workflow that sends an e-mail whenever an Issue is opened. It uses the community action send-email <marketplace/actions>.
name: Notify Support on Issue
on:
  issues:
    types: [opened]

jobs:
  email:
    runs-on: ubuntu-latest
    steps:
      - name: Send e-mail
        uses: dawidd6/action-send-mail@v3
        with:
          server_address: smtp.mailtrigger.app
          server_port: 587
          secure: true
          username: devops@example.com
          password: ${{ secrets.MT_DEVOPS_PASSWORD }}
          from: devops@example.com
          to: support@example.com
          subject: "New Issue: ${{ github.event.issue.title }}"
          body: ${{ github.event.issue.body }}
Store the mailbox password in a GitHub Secret (`MT_DEVOPS_PASSWORD`).
What Happens Now?#
Any Issue opened on GitHub triggers the workflow which sends an e-mail from
devops@example.comtosupport@example.comvia MailTrigger.MailTrigger’s default SMTP to Origin route relays that message through your real SMTP host.
If the subject contains the word payment, the message also matches your
Payment-Issue → Aliceroute, which forwards a copy toalice@example.com.
Alternative Setup: Trigger Routes via Built-In Mailbox#
In the previous example, the GitHub workflow sends emails directly to support@example.com.
MailTrigger uses that mailbox to decide whether to forward messages to Alice.
However, there’s an alternative approach that does not require modifying your GitHub workflow at all.
Instead of changing the sender address or editing workflow files,
you can simply create a forwarding rule inside support@example.com
to automatically redirect all emails to a built-in MailTrigger mailbox, such as bob@mailtrigger.app.
How This Works#
When bob@mailtrigger.app receives a forwarded email,
MailTrigger will match it against a new route — similar to the earlier one, but scoped to this mailbox.
You can use the following setup:
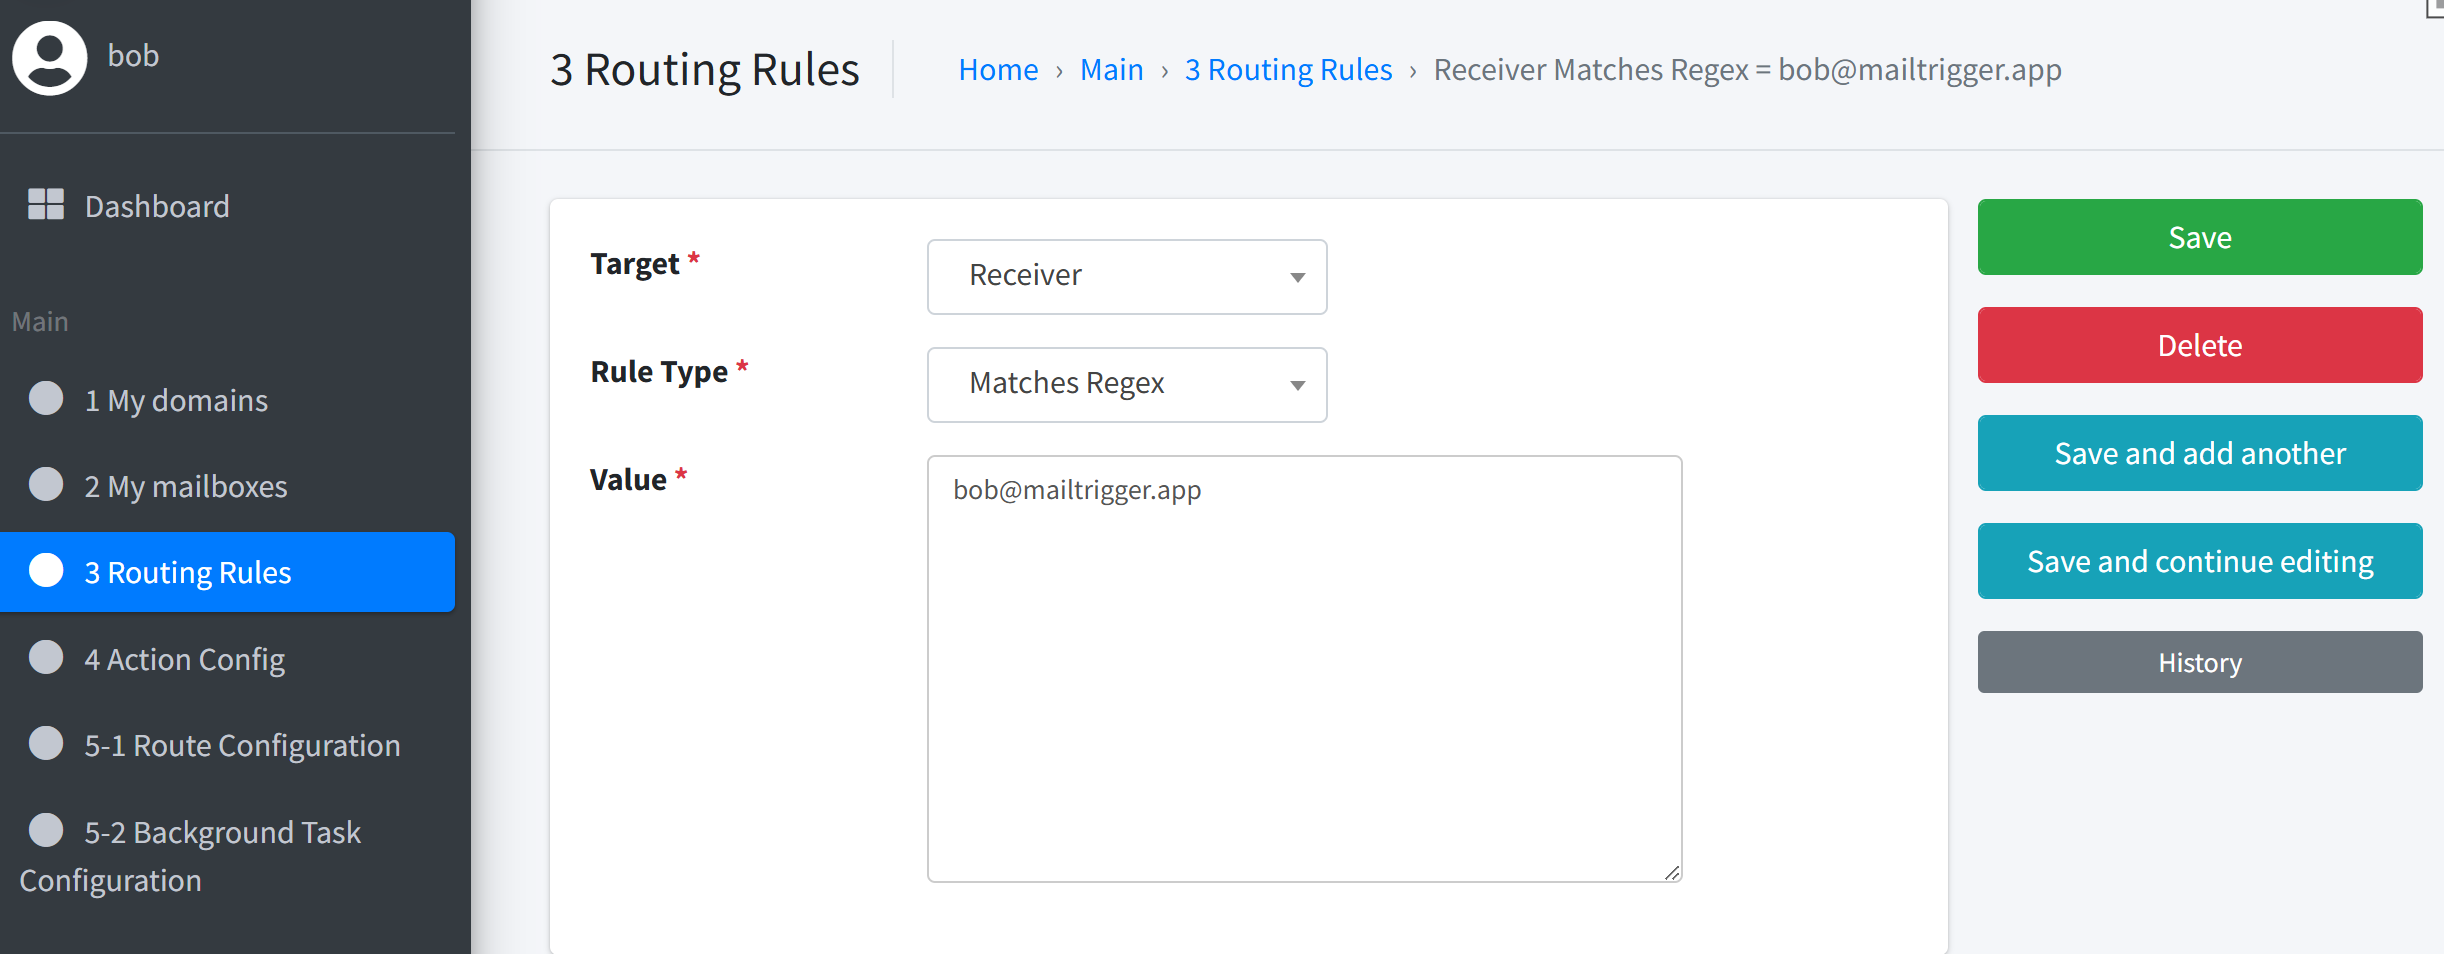
Rule
Receiver =
bob@mailtrigger.appSubject contains
payment
Action
Forward to
alice@example.com
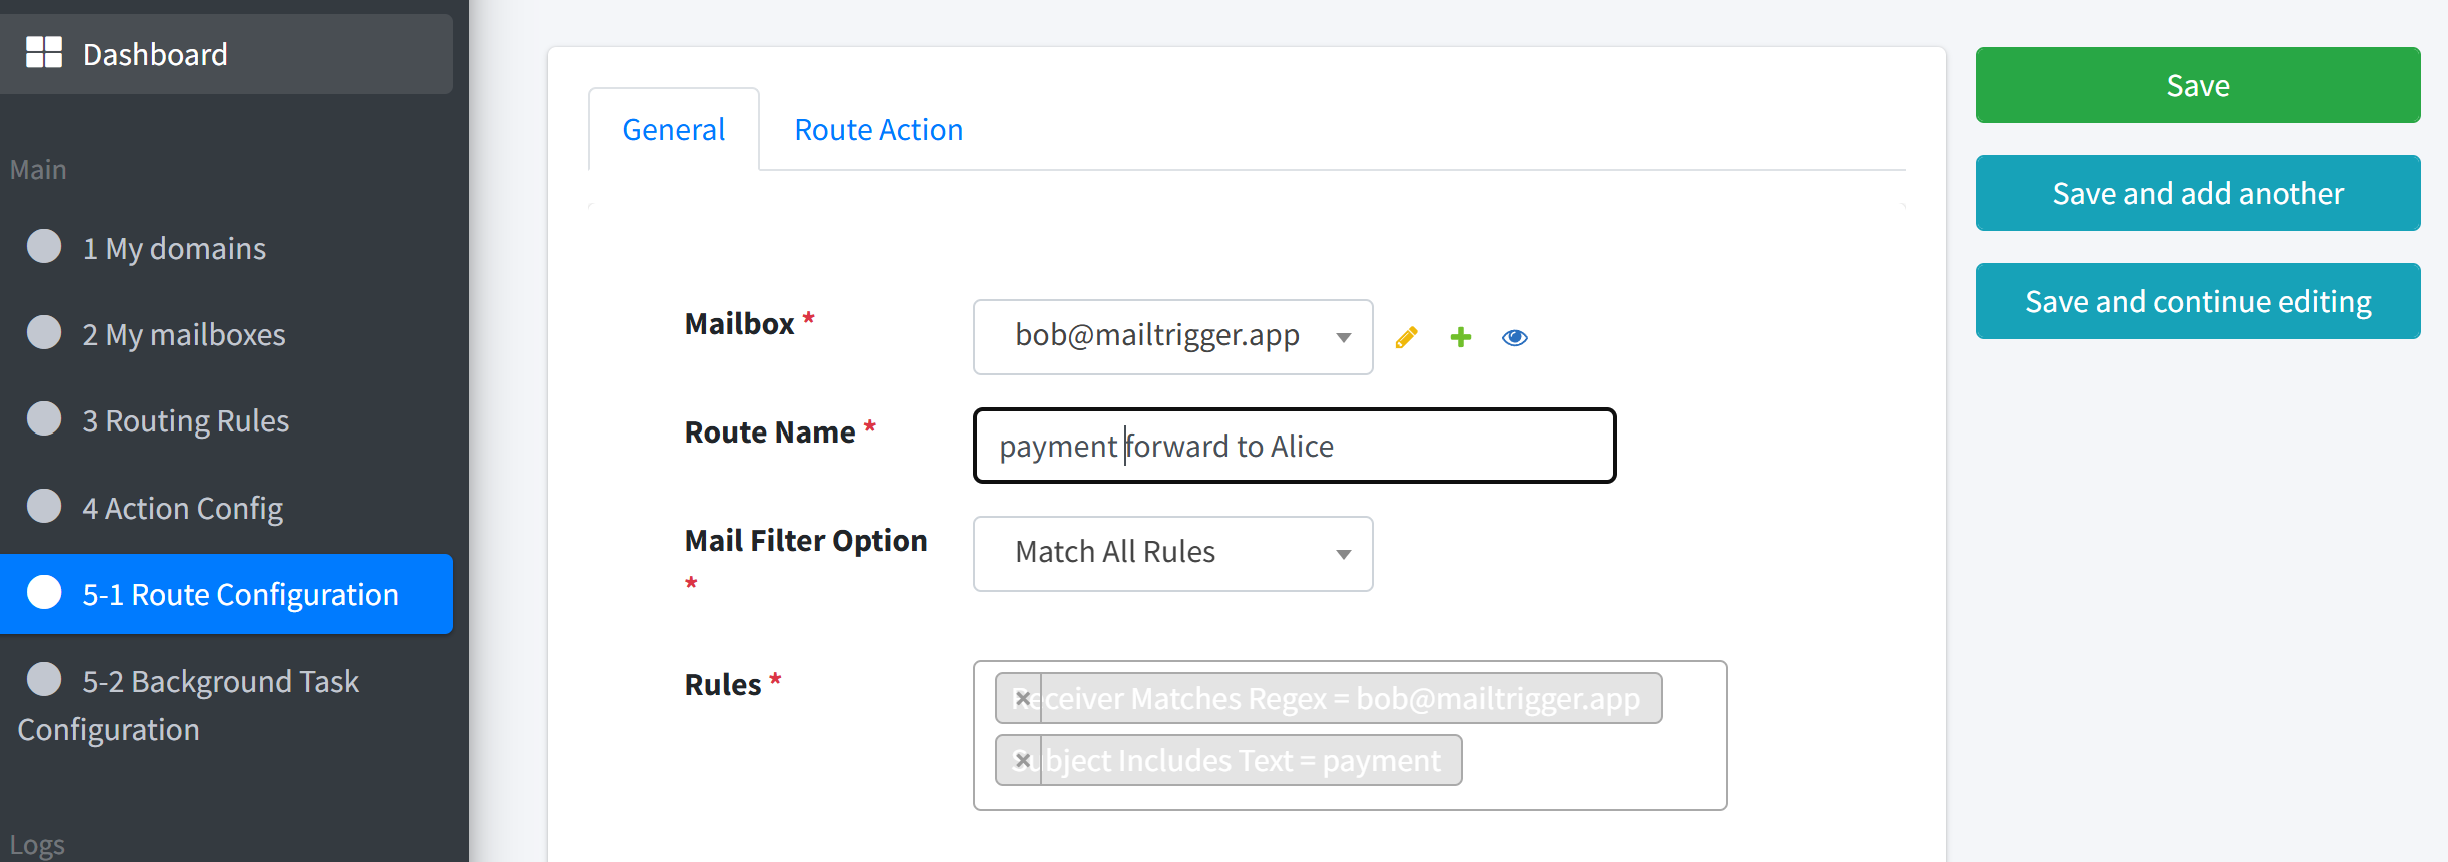
Route
Bound to the bob@mailtrigger.app mailbox
Matches emails forwarded from Support
Triggers the same Forward to Alice action
This approach lets you use MailTrigger without needing to modify your GitHub workflow file.
All you need to do is configure support@example.com (within your mail provider or server settings)
to automatically forward all incoming GitHub issue notifications to bob@mailtrigger.app.
Why This Might Be Useful#
Your GitHub setup is managed by another team or can’t be easily changed
You want to experiment with MailTrigger without touching production workflows
You prefer to keep MailTrigger’s logic completely isolated
This is a flexible alternative that still gives you full MailTrigger functionality — routing based on content, triggering multiple actions, and integrating with downstream tools.
Enhancement: Add Telegram Alerts for Alice#
Story: Alice Checks Telegram More Than Email#
Although Alice now receives “payment” Issue e-mails in her inbox, she usually relies on Telegram for real-time alerts. By adding a Telegram Action to the Payment-Issue → Alice route, MailTrigger can push the same notification to her Telegram chat the moment the e-mail arrives.
Goal & Expected Outcome#
Keep forwarding payment-related Issues to alice@example.com (e-mail).
Simultaneously send a Telegram message to Alice’s chat so she never misses an urgent billing Issue.
Steps to Add Telegram Notifications#
STEP 1: Obtain Alice’s Bot Token & Chat ID#
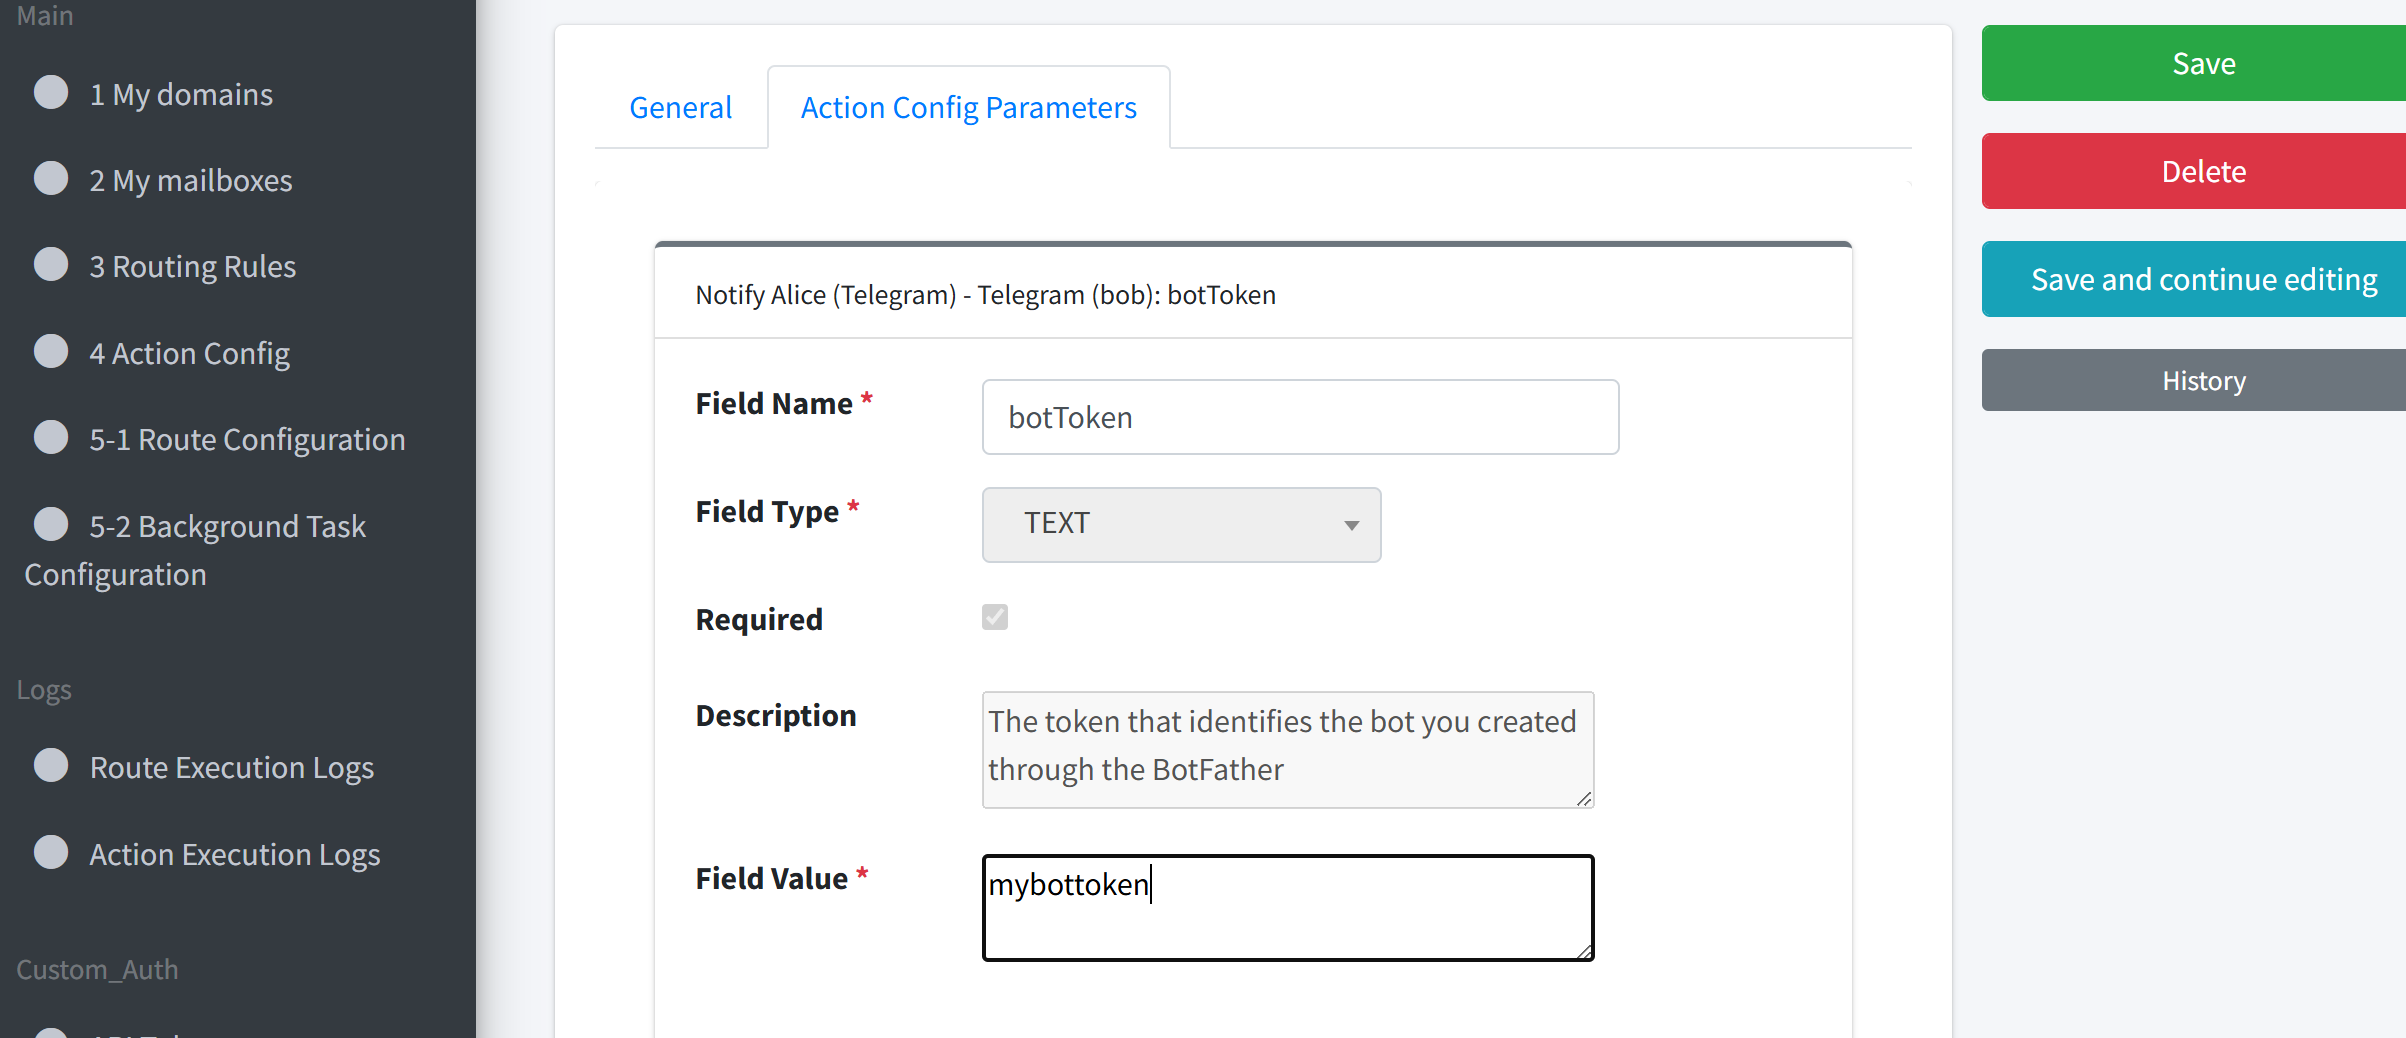
To use the Telegram Action, Alice needs her own botToken and chatId.
For how to obtain these, see the Telegram Action section.
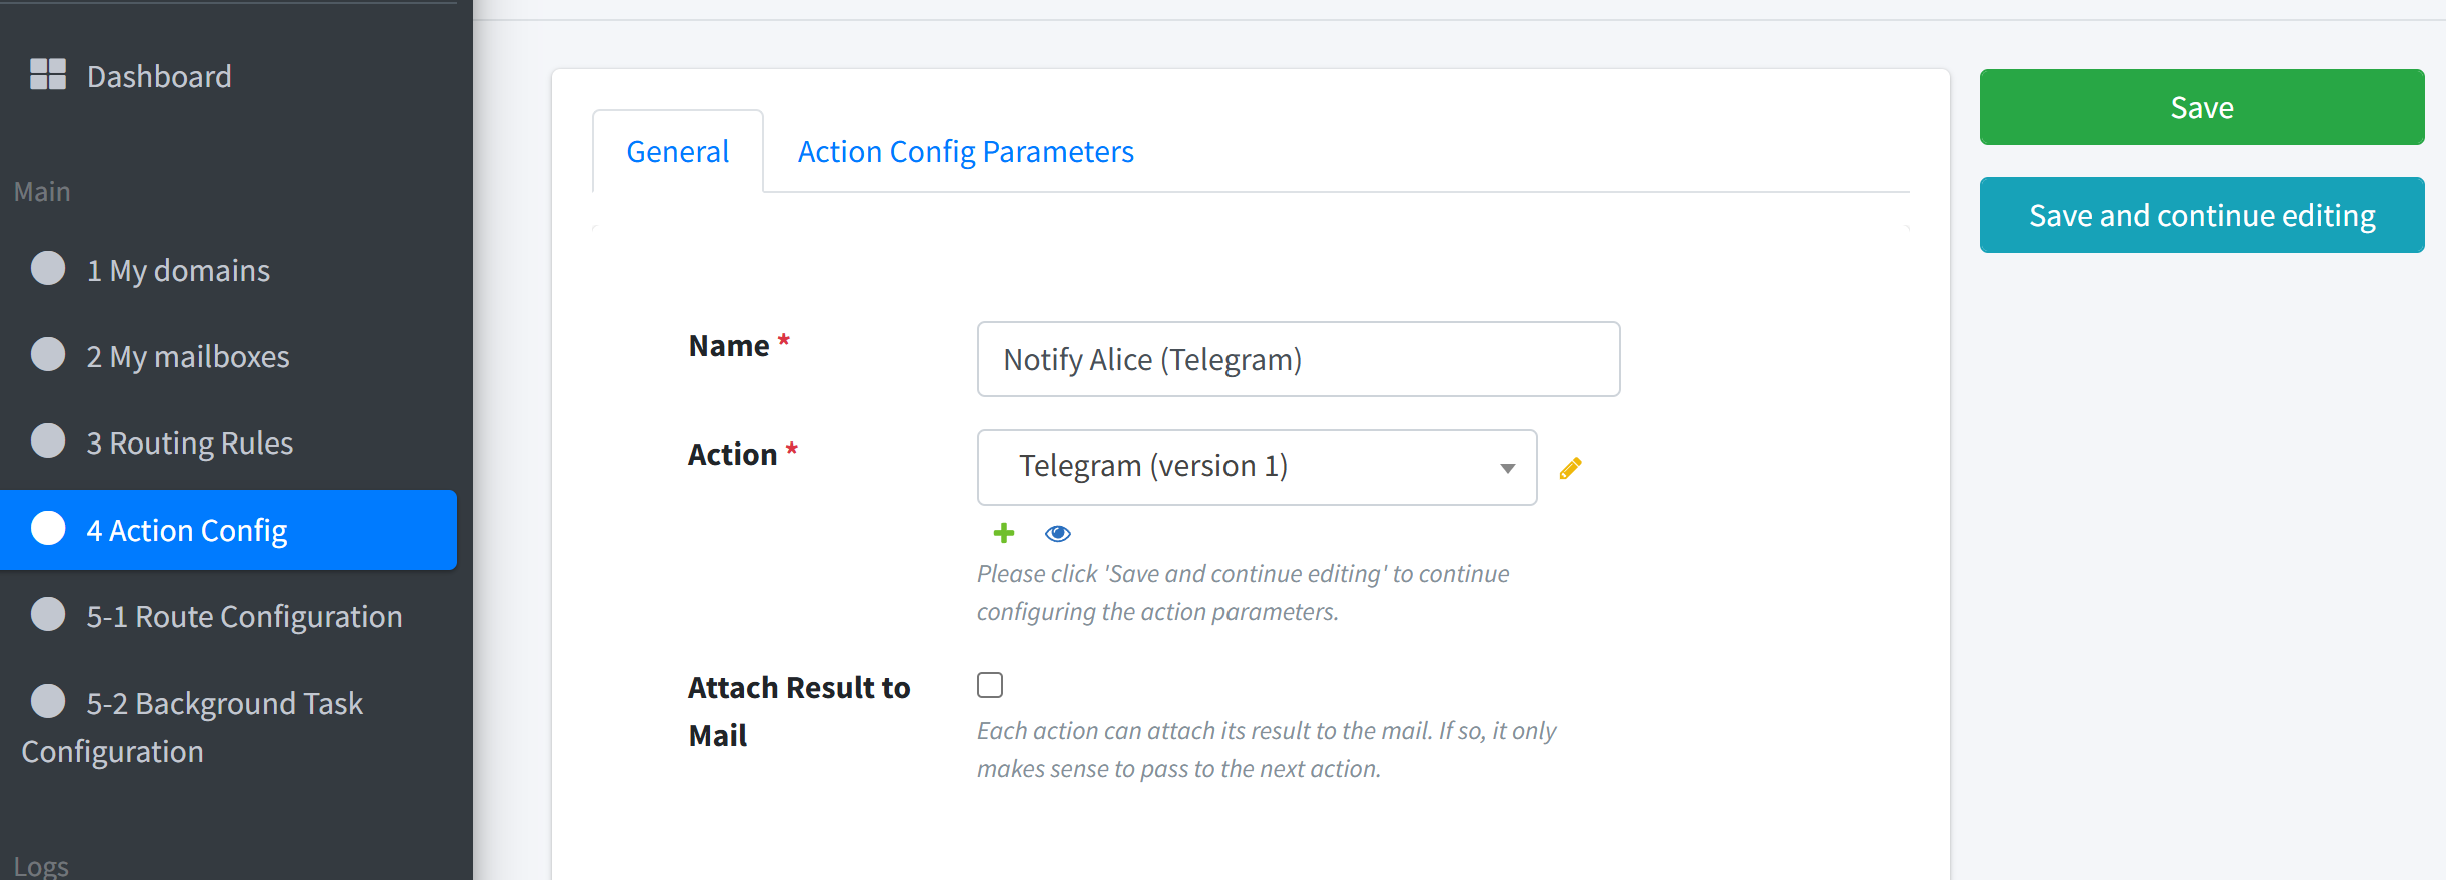
STEP 2: Create the Telegram Action#
Name :
Notify Alice (Telegram)Action Type: Telegram
Parameters
botToken:<AliceBotToken>chatId:<AliceChatId>title: default – Issue subjectbody: default – Issue body
STEP 3: Attach the Action to the Existing Route#
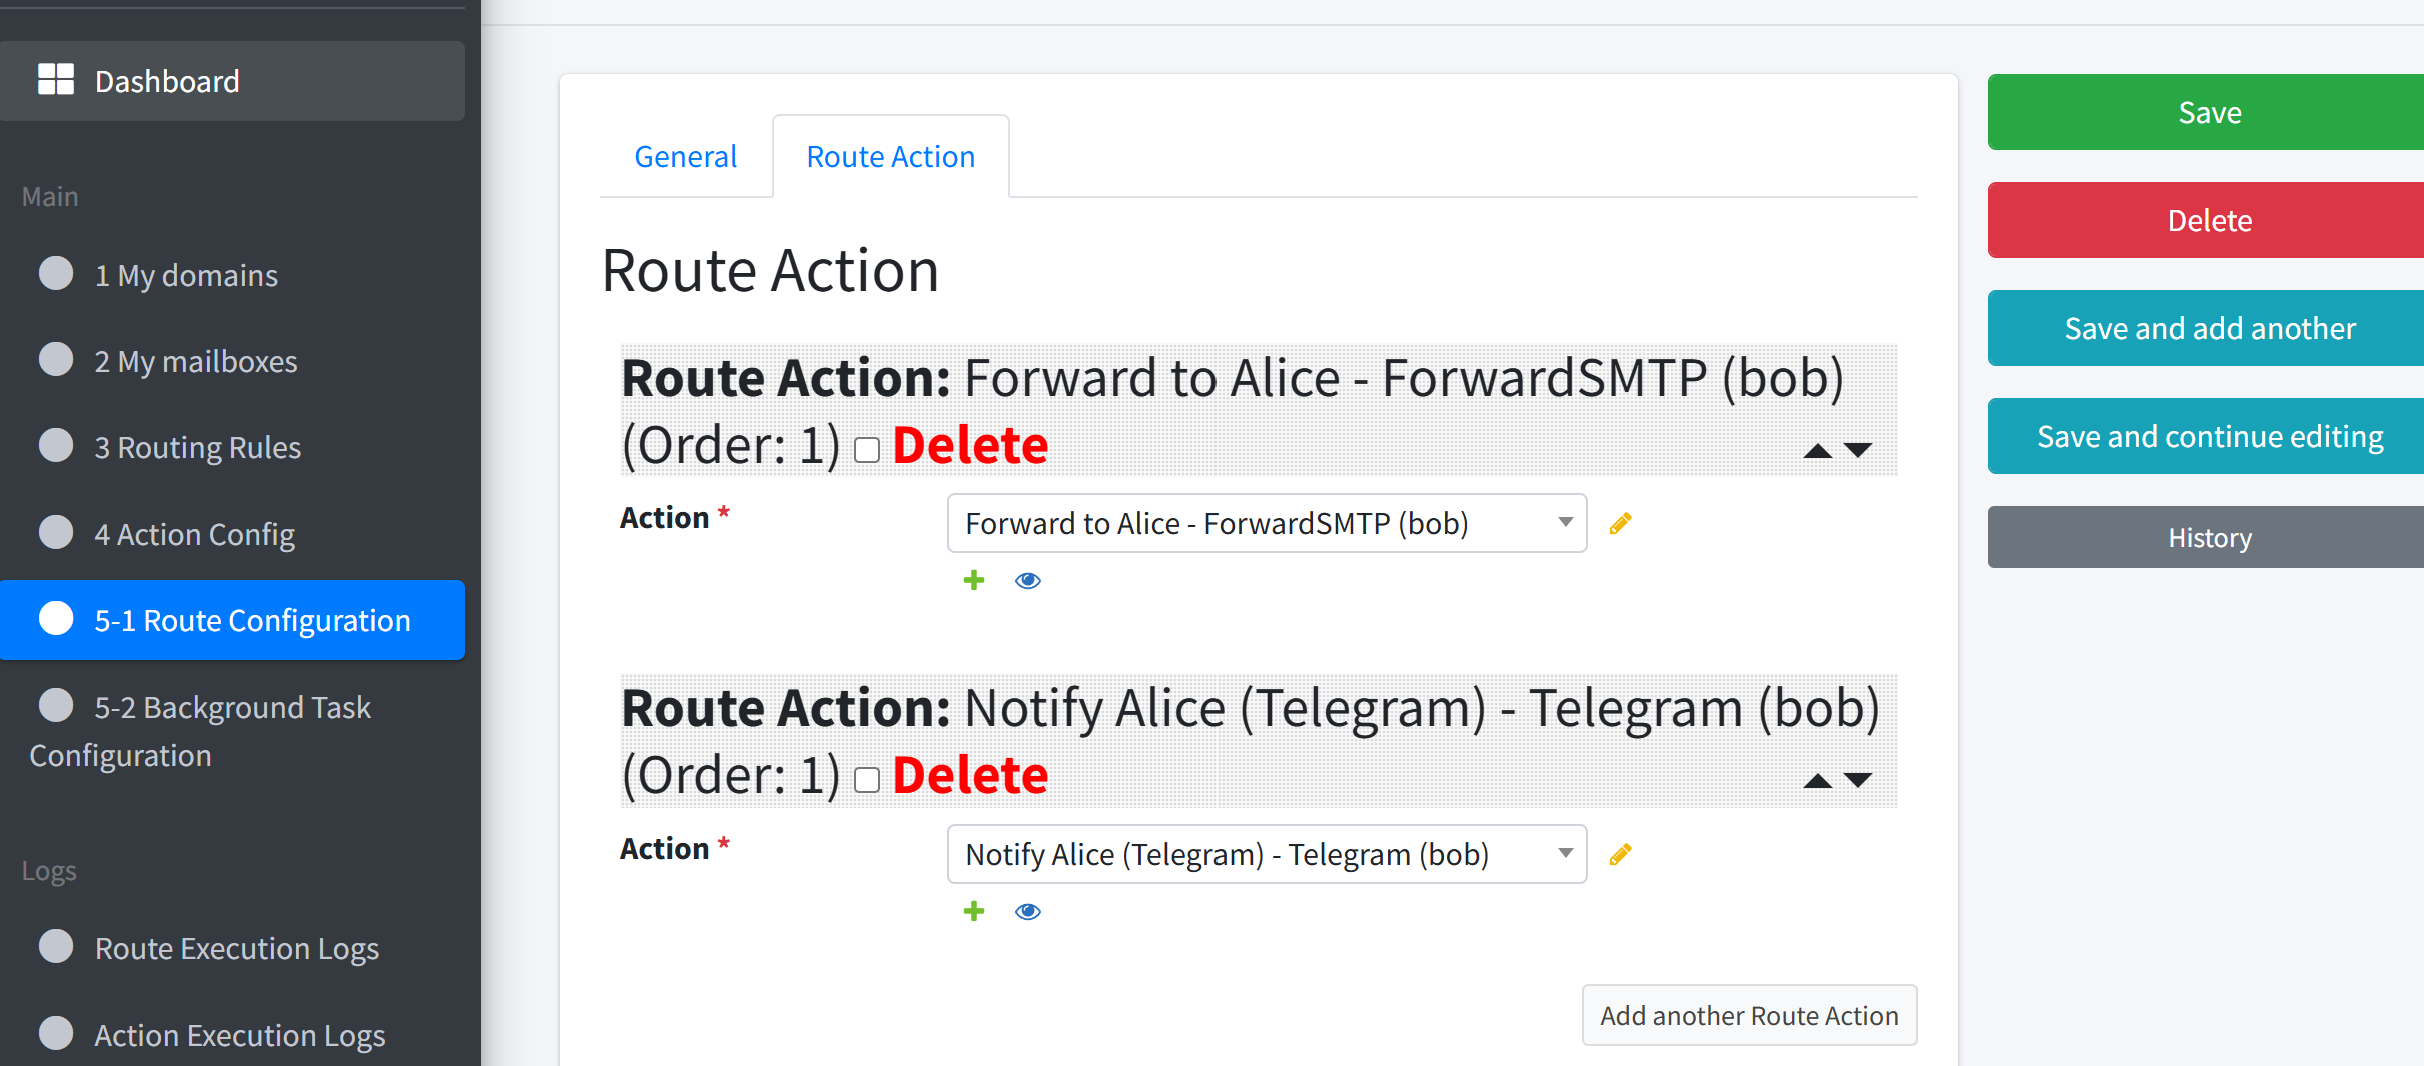
Open the Route named Payment-Issue → Alice that you previously built.
Drag Notify Alice (Telegram) into the Actions list after
Forward to Alice(your route now contains two actions).Set Execution Mechanism to Parallel so the e-mail forward and Telegram notification run at the same time.
Note
Sequential runs actions one after another. Parallel runs them concurrently and is ideal when the actions are independent—as in this case.
Leave Pass to Next Route unchanged (optional).
Quick Test#
Refer to the previous 6. Quick Testing (Command Line) commands. Send a manual e-mail containing “payment” in the subject. You should observe:
support@example.com receives the original Issue e-mail.
alice@example.com receives a forwarded copy.
Alice’s Telegram chat receives an instant bot message with the Issue details.
Your Payment-Issue → Alice route now delivers alerts by both e-mail and Telegram, ensuring Finance sees them right away.
