Advanced Features#
LLM Rule usage and prompt examples#
MailTrigger supports using LLM prompts as rule logic. When you select LLM Prompt as the rule type, the entire email content is sent to your configured LLM provider along with your prompt. The prompt must return a boolean value, for example:
Is this email related to a user account issue?
This will trigger the LLM to analyze the email and return True or False, determining whether the rule matches.
Use cases include:
Customer complaint detection
Spam or fraud email detection
User request classification (e.g., refund, upgrade)
LLM Action#
LLM Actions allow you to use a prompt to process email behavior, such as modifying content, generating attachments, or determining whether to proceed with subsequent actions.
Note
For a real-world usage example of how LLM Actions can be applied, see this Auto Respond example using an LLM Action.
Feature 1: Modify Email Content#
If “Attach to Mail” is not checked, the LLM’s return value will be used to directly modify the email content. The following fields can be updated:
subject
body
receivers
sender
Example prompt:
Please rewrite this subject line to make it clearer.
Feature 2: Control whether to execute next Action (passToNext)#
You can include instructions in your prompt that indicate whether to continue executing the remaining actions in the route.
If this is determined to be spam, return a warning message and stop any further actions.
Feature 3: Attach response as a file#
If “Attach to Mail” is checked, the returned text will be saved as a .txt file and added as an attachment.
You can then reference the result using:
$ATTACHMENT1– first attachment content$ATTACHMENT_LAST1– last attachment content$ATTACHMENT– a list of all attachment contents$ATTACHMENT2– second attachment$ATTACHMENT_LAST2– second-to-last attachmentand so on…
JS Rule & Javascript Action#
JS Rule: Custom logic using JavaScript#
You only need to write the logic that returns a boolean. Your code is automatically wrapped in the following format:
return mail.subject.includes("hello");
The mail variable is provided and contains:
mail.subject: email subject
mail.body: email body
mail.sender: sender
mail.receivers: list of recipients
mail.attachments: list of attachment contents (as strings)
Javascript Action: Dynamically modify or process email#
Note
To see a practical example of how a Javascript Action is used in a real workflow, check out this Webhook → JS → Telegram scenario.
You can:
Directly modify email fields (subject, body, receivers)
Return content as an attachment (if “Attach to Mail” is checked)
Write only the return block. Your code will be wrapped automatically in an async function. Use mail as the input variable.
// Modify email content
return {
    subject: "New Subject",
    body: "Updated body content"
};
To generate an attachment:
return {
    data: "This content will be added as an attachment"
};
Attaching Action Results as Mail Attachments#
Some actions (such as LLM Action, Javascript Action, and Webhook (API) Action) allow you to attach their execution results to the original email as a .txt file.
This makes it possible for subsequent actions in the route to reuse the result by referencing the attachment content.
Why is this useful?
It allows each action to focus on one step (e.g., generate → reuse → respond).
You can chain complex behavior without writing all-in-one logic.
Examples:
An LLM Action analyzes the email and generates a reply → attaches the reply as
summary.txt→ the next Auto Respond Action uses$ATTACHMENT_LAST1as the reply content.A Javascript Action extracts the error code from a mail log → attaches it → the next Webhook (API) Action posts the error code via API using
$ATTACHMENT1.
File naming convention
Attached result files are named using the format:
attachment-action-{action_id}.txt
This ensures traceability and allows you to identify which action generated which file.
Note
For a real-world example of how attached results from an LLM Action can be reused by another action, see this Auto Respond scenario.
Inline Variables for Actions#
When configuring an action, you can use inline variables to reference the contents of the original email. These variables let you dynamically insert values like the subject, body, sender, or even attachment contents into action parameters.
For example, if you’re creating a Forward or Auto Respond action, you can write the body like this:
original message: $BODY
When the action runs, $BODY will be replaced with the full body text of the original email.
Available Inline Variables#
$SUBJECT– The original subject of the email$BODY– The original body content (text/plain or fallback from HTML)$SENDER– The sender’s email address$RECEIVERS– A comma-separated list of all recipients$ATTACHMENT– A list of all attachment contents (as raw string or base64)$ATTACHMENT1,$ATTACHMENT2– The first and second attachment contents$ATTACHMENT_LAST1,$ATTACHMENT_LAST2– The last and second-to-last attachment contents
Usage Examples#
Forwarding email with context: Body:
Forwarded by MailTrigger:\n\n$BODYAuto Respond with last attachment as reply: Body:
$ATTACHMENT_LAST1Webhook payload with sender and subject: JSON:
{
  "from": "$SENDER",
  "subject": "$SUBJECT",
  "message": "$BODY"
}
LLM-generated file passed to next action: An LLM action writes a summary as an attachment → the next action (e.g. Auto Respond or Webhook (API)) uses
$ATTACHMENT_LAST1to reuse it.
These variables allow powerful chaining and customization across actions without writing code.
Variable Substitution with Attachments#
MailTrigger supports dynamic variable substitution across all Actions and their parameters. This allows you to personalize or customize message content without rewriting templates.
Note
Dynamic variables and inline variables can be used together.
Inline variables are fixed system-defined placeholders (e.g.,
$SUBJECT,$BODY).Dynamic variables (e.g.,
%NAME%) come from themailtrigger_params.jsonattachment and can be custom defined per email.
Using both lets you mix built-in values with custom, user-provided ones.
In your email, include an attachment named
mailtrigger_params.json.The content of this attachment should be a JSON object containing key–value pairs of your variables. For example:
{
  "NAME": "Jason"
}
Anywhere in your message body or Action parameters where you use placeholders like
%NAME%, MailTrigger will automatically replace them with the provided value.
Original email body:
Hi %NAME%, thank you for your email.
With
mailtrigger_params.jsonset to{"NAME": "Jason"}, the final delivered body will be:Hi Jason, thank you for your email.
Action parameter substitution:
Suppose you configure an Action parameter
bodywith:Hi, this is the mail body by %NAME%.
With the same attachment, the result becomes:
Hi, this is the mail body by Jason.
Variable substitution applies generally: It works with any Action and can substitute values in any Action field.
This mechanism ensures flexibility: you can maintain reusable templates while injecting values per message.
Email forwarding and SMTP relay#
Forward Action: Send to another mailbox via external SMTP#
Repackages and sends using a specified SMTP server. Commonly used to notify third parties.
Parameters:
smtp_server: SMTP host
receivers: destination addresses
timeout: timeout in seconds (default: 30)
MailTrigger SMTP Action: Send mail directly via MailTrigger#
This action sends email directly from MailTrigger’s internal SMTP server (smtp.mailtrigger.app) — no external SMTP is involved.
Requirements:
You must configure your DNS with SPF (e.g.,
a:smtp.mailtrigger.app)DKIM and DMARC setup are mandatory to prevent delivery issues
Email is sent via TLS (port 587), authenticated using your MailTrigger mailbox and password
This is suitable for Gmail’s “Send mail as” setup, or as a lightweight SMTP relay for teams or services.
Important: Because MailTrigger is the actual sender, proper DNS configuration is mandatory to avoid being flagged as spam.
Setting Up Scheduled Actions#
Jack uses a server resource management system that emails him about all server resource changes. However, due to the frequent notifications, Jack misses important messages. To address this, Jack uses MailTrigger’s background task execution feature to write the necessary logic and compile it into a WASM file. Here are the complete steps:
Configure routes so that emails related to “server resource changes” take no action, ensuring they do not clutter Bob’s mailbox.
In the MailTrigger dashboard, navigate to Background Task Settings and create a new configuration.
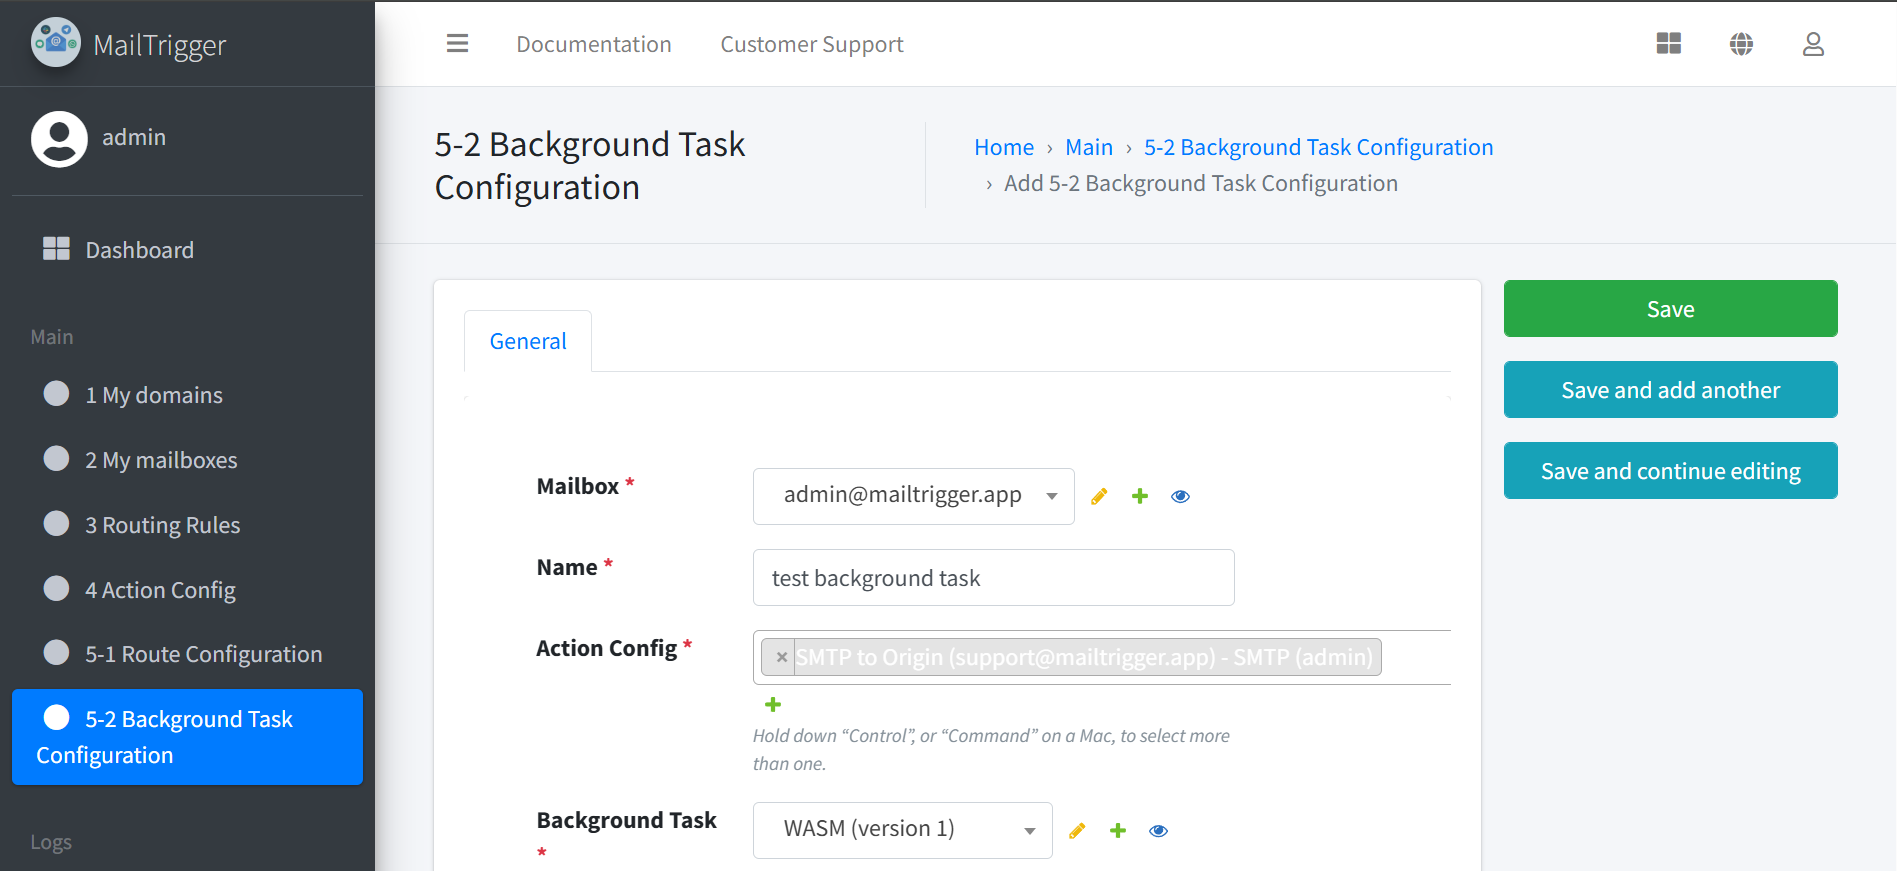
Configure the background task:
Set a clear name, such as “Resource Monitor”.
Choose the mailbox and frequency (e.g., every 1 hour).
Save and enable the task.
To confirm the task is working:
Go to the Task Configuration list.
Check the Status column to ensure it shows “Success”.
A Simple HTTP-based Email Notification Service#
Send an email via a specific MAILBOX (SMTP) using a single HTTP request, and inject dynamic values with parameters to personalize messages per recipient.
Note
Before using this API, we recommend reading the
Variable Substitution with Attachments section to understand how placeholders
like %NAME% can be dynamically replaced.
Scenario: Bob’s use case#
Bob is building an auto-mailer that sends a similar message to different people:
Hi %NAME%, thank you for your email.
Instead of rewriting content for each recipient, Bob just changes parameters such as
{"NAME": "Jason"} or {"NAME": "Amy"}. One API call sends the email with the right name.
SMTP Action Parameters#
Bob chooses to use this HTTP API to send the mail (SMTP Action). When configuring the SMTP Action, Bob can provide values for the following fields:
subject: set this toThanks for reaching outbody: set this toHi %NAME%, thank you for your email.
These values can include placeholders (like %NAME%) that will be replaced dynamically using the parameters map in the request.
Endpoint#
POST /api/v1/mailbox/{id}/mail/send
Authentication#
Use your MailTrigger API token for the user who owns the MAILBOX.
Include it in the header:
Authorization: Token <YOUR_API_TOKEN>.
Request JSON#
to(string)Recipient email address.
parameters(object)Key–value map used to replace placeholders in
body(e.g.{"NAME": "Jason"}).subject(string) (optional)Email subject line. (you can leave this blank and still set up the mail subject in the action parameters).
body(string) (optional)Email body text. (you can leave this blank and still set up the mail body in the action parameters).
attachments(array) (optional)A list of attachments to include in the email. Each item must follow this format:
{
  "contentType": "application/pdf",
  "name": "my_attachment.pdf",
  "data": "{BASE64_ENCODED_CONTENT}"
}
Example with multiple attachments:
"attachments": [
  {
    "contentType": "application/pdf",
    "name": "my_attachment.pdf",
    "data": "JVBERi0xLjQKJcTl8uXrp..."
  },
  {
    "contentType": "application/json",
    "name": "mailtrigger_params.json",
    "data": "{\"name\": \"bob\"}",
    "encoding": "utf-8"
  }
]
Note
All attachments support Base64.
If the
encodingfield is omitted, it defaults tobase64and thedatavalue must be Base64-encoded.Only
text/*andapplication/jsonattachments may optionally use UTF-8. In this case, theencodingfield must be explicitly set to"utf-8".If an attachment named
mailtrigger_params.jsonis provided and you also include theparametersfield in the request body, MailTrigger will merge the variables from both sources.
Example: send with CURL#
curl -X POST \
  https://app.mailtrigger.app/api/v1/mailbox/123/mail/send \
  -H "Content-Type: application/json" \
  -H "Authorization: Token YOUR_API_TOKEN" \
  -d '{
    "to": "jason@example.com",
    "parameters": { "NAME": "Jason" },
  }'
What happens#
The message is sent from the specified MAILBOX via SMTP.
All occurrences of placeholders in
body(e.g.%NAME%) are replaced usingparameters.To email someone else, change
toand updateparameters—no need to modify the template text.
For a more advanced usage example, see this LLM + SMTP dynamic prompt scenario.